advetra

Sunday, July 6, 2025

Warm eggplant salad with parmigiana

 An ideal salad for all tastes


Capas de berenjena a la parmesana que se retiran de la sartén 

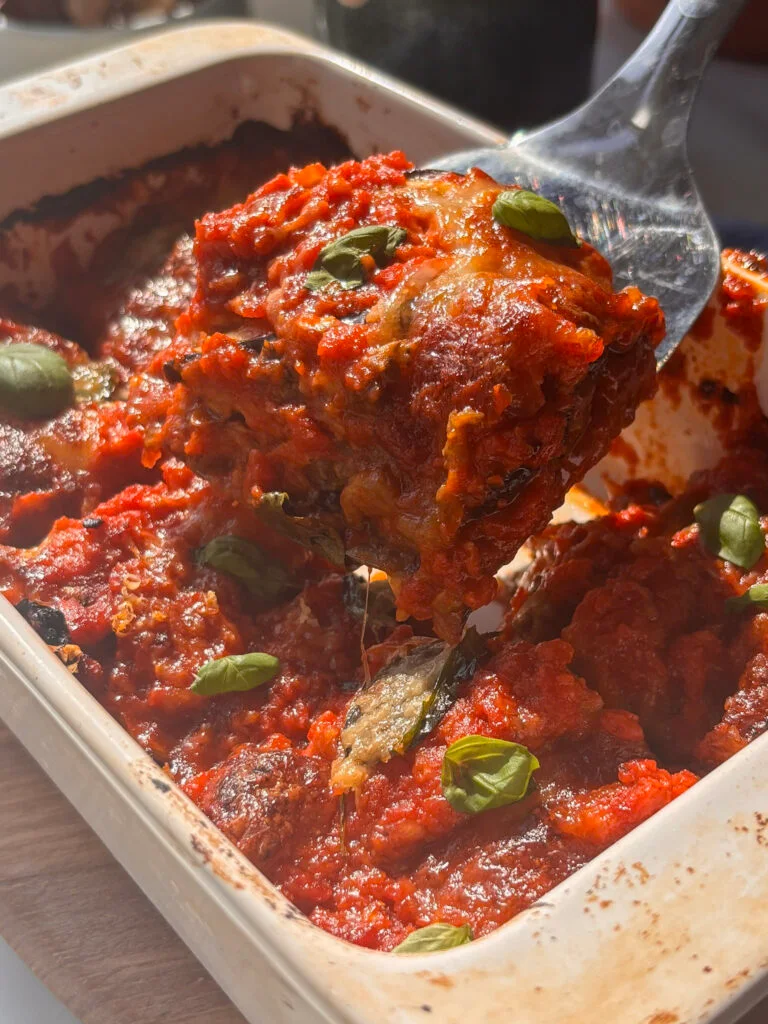
 Eggplant Parmesan (or melanzane alla parmigiana) is a classic Italian comfort dish, made with layers of roasted eggplant, a rich tomato sauce, and melted cheese. It's a delicious yet simple vegetarian staple and a fantastic make-ahead meal. Serve it on its own, with crusty bread, or paired with a fresh salad for a comforting dinner. This is one of those dishes that takes a little extra effort and is well worth the wait! 

Serve it with a fresh green salad tossed in balsamic dressing, some warm focaccia or garlic bread to soak up the extra sauce, and add a glass of red wine for a delicious and cozy dinner.

 Ingredients

3 eggplants
3 tablespoons olive oil
3 large garlic cloves
400g crushed tomatoes + 1/2 can water
200g passata
1 teaspoon dried oregano
1 teaspoon sugar
Salt and pepper to taste
20g fresh basil leaves
200g fresh mozzarella cheese
50g hard cheese 

The exact ingredient quantities you need for this recipe are included in the recipe card at the end of this post. Here's a quick rundown and some tips:

Eggplant: Salting the eggplant helps remove excess moisture and bitterness, resulting in soft, creamy slices once roasted. I don't recommend skipping this step! Traditionally, eggplant parmesan requires breading and frying the slices, but in this recipe, we roast them for an easier and healthier option.
Tomato Sauce: This recipe uses a combination of passata and crushed tomatoes, along with other simple ingredients like garlic and a pinch of sugar, to achieve the perfect balance between a smooth sauce and an even texture. We're looking for a thick sauce so it holds the layers together and doesn't become soggy when baked.
Cheese: Fresh mozzarella cheese gives that classic, springy texture to all the layers of the dish; Pair it with grated hard cheese (like Pecorino or Parmesan if you're not vegetarian) for extra flavor.

Fresh Basil: Adds a touch of freshness between the rich layers.

Variations and Substitutions
For a cheesier dish, add ricotta or a little béchamel sauce between the layers.
For a lighter version, roast the eggplant instead of grilling it and use less cheese.
If you prefer a crispy coating, use gluten-free breadcrumbs on top for extra crunch. You can also coat the eggplant in beaten egg and breadcrumbs and then roast or fry it. 


Elaboration

1. Prepare the eggplant
Slice the eggplant and season it with salt to extract its moisture. Rinse and pat it dry. Place it on a baking sheet, brush with oil and pepper, and roast until tender.

2. Prepare the tomato sauce and cheese.
Sauté the garlic, then add the crushed tomatoes, passata, oregano, sugar, and seasoning. Simmer until thickened and flavorful.

Grate the mozzarella and mix it with the grated hard cheese.

Cut the eggplants from the top and bottom and slice them vertically. Lay them flat, sprinkle with salt, and let them rest for 15 to 30 minutes to drain.
Rinse the eggplants well, pat them dry, and then place them on a baking sheet (without overlapping!).
Brush the eggplants with oil and a little black pepper, then roast them for 40 minutes.

Meanwhile, make the tomato sauce. Heat 1 tablespoon of olive oil in a pan and add the chopped garlic, sautéing for 1 to 2 minutes.
Add the crushed tomatoes, the passata, about half the can of water, the dried oregano, sugar, salt, and pepper. Stir and let simmer for 30 minutes until the sauce is thick and thickened.
Grate the fresh mozzarella into a bowl and mix it with the hard cheese.
Take your baking dish and have the four components (eggplant, tomato sauce, cheese mix, and basil leaves) arranged nearby.
Preheat the oven to 200°C (400°F).
Spread a thin layer of tomato sauce on the bottom of the dish and then add a layer of roasted eggplant. Add a layer of cheeses and basil leaves. Repeat two more times, until you have another layer of tomato sauce, eggplant slices, cheese mix, basil leaves, and the same.
Finish with the last layer of mozzarella and hard cheese, then bake for 30 minutes until cooked through and golden brown on top.
Let the eggplant Parmesan rest for 10 minutes before slicing and serving.

3. Layer it
In a baking dish, layer the tomato sauce, roasted eggplant, cheese blend, and fresh basil. Repeat the layers two more times, finishing with cheese on top.
 

Bake until golden and bubbling, then let it rest for 10 minutes before slicing to ensure it holds together.

Tips

Don't skip salting the eggplant: Salting it is key to making it soft and not mushy. Don't skip this step! It takes a maximum of 30 minutes longer, but you can do other things while the eggplant rests. Rinse it well and dry it with a clean cloth or paper towel before brushing it with oil and grilling it.
Resting the dish: Let the dish rest for at least 10 minutes before cutting. This helps the layers set.
Use fresh mozzarella: Freshly grated cheese melts better than pre-grated, so use a block of mozzarella and grate it yourself if possible.
Make sure the tomato sauce is thick: Letting the tomato sauce simmer until it thickens is essential for this dish; otherwise, you could end up with a watery eggplant parmigiana.

Storage

 
Store leftovers covered in the refrigerator for up to 3 days. Reheat the eggplant parmesan in the oven or microwave until piping hot. You can also freeze portions for up to 2 months: simply wrap tightly and reheat from frozen or thaw overnight.

Serving Instructions
 

Eggplant parmesan is delicious warm with crusty bread or a fresh salad. It's so filling that it can be enjoyed as a main dish, but it also makes a great side dish for a larger Italian feast! I love it served with garlic bread on the side to soak up the sauce and a rich arugula salad.

Frequently Asked Questions
Can I prepare it in advance?
Yes! Prepare the dish up to a day in advance, cover it, and store it in the refrigerator. Bake it when ready to serve.

Can I freeze eggplant parmesan?
Of course. Let it cool completely, wrap it well, and freeze it for up to 2 months. Reheat it from frozen or thaw it overnight.

Does it need to be fried?
No: roasting it is healthier, less messy, and still has a delicious texture.

Notes

Store leftovers covered in the refrigerator for up to 3 days. Reheat them in the oven or microwave until piping hot. You can also freeze them for up to 2 months: simply wrap them tightly and reheat them from frozen, or thaw them overnight. 


Sunday, June 22, 2025

Lemon Chicken: A Quick and Delicious Recipe

Lemon chicken is one of those foolproof recipes, where the citrus aroma and flavor enhance the flavor of this bird, so popular in cuisines around the world.
 
The aroma of lemon is a classic for cooking chicken in virtually every recipe book in the world. Roasted or fried, it's a recipe that's loved by children and adults alike, and it's recommended to add a side of white rice, pasta, or vegetables to turn it into a magnificent single dish. We can make the same exact recipe with orange, tangerine, or lime instead of lemon, and it's also delicious. Here's one of the foolproof lemon chicken recipes.
 
 
If you're using chicken breasts, cut them into medallions for faster and more even cooking, although thighs with bone and skin on are juicier.
You can pre-marinate the chicken with lemon, grated garlic, spices, and herbs to add more flavor.
 
An alternative is to sear the chicken in a hot pan with a little oil so it's golden and crispy on the outside, then finish cooking it in the oven at a moderate temperature so it cooks through without drying out.
The broth, wine, and lemon juice, in addition to flavor and aroma, add juiciness.
A little flour will help bind the sauce.
There are numerous side dishes for this dish, including white rice, roasted potatoes, or mashed potatoes.
 
 
2 chicken breasts
1 splash of chicken broth
2 tablespoons of olive oil
2 tablespoons of butter
3 lemons
1 splash of white wine
salt
black pepper
2 tablespoons of parsley
 
 
Wash the lemons, cut 2 in half and the other into slices.
Squeeze the juice out of 4 halves and reserve the juice.
Heat the oil and butter in a saucepan and cook the chicken breasts until browned.
Stir in the wine and let the alcohol evaporate.
Add the lemon juice, season with salt and freshly ground pepper, and cook over medium-low heat for 10 minutes.
Add the broth and cook over low heat, covered, for another 15 minutes.
Serve the chicken with chopped parsley and a few slices of the reserved lemon—you can grill them or serve them as is. 
 
Lemon Chicken Tip

Before sautéing the chicken, dust it with a little flour to seal in moisture and prevent it from drying out. 
 
 
Lemon juice is a powerful antioxidant, making it an excellent remedy for preventing the effects of free radicals on our bodies. It primarily contains vitamin C, but also flavonoids and beta-carotenes, among others. 


Sunday, June 8, 2025

Napoleon Eggs


Huevos Napoleón: Receta Fácil y Rápida Paso a Paso 


This Napoleon egg recipe is so named because the cooks often made it for him. Napoleon liked to have his food ready quickly, and his cooks made this recipe for him because it was so easy and quick to prepare.


Ingredients, for 4 people

8 eggs

2 spring onions

2 green peppers


2 garlic cloves

8 slices of bread (day old)

200 g grated cheese (for melting)

Extra virgin olive oil

Salt

Parsley


Preparation

Cut the bread into cubes, place them on a baking sheet, and bake at 220°C until golden brown. Remove and set aside.

Peel and chop the garlic cloves and brown them in a pan with a drizzle of oil. Julienne the spring onions and add them. Remove the stems and seeds from the peppers, cut them into large cubes, and add them. Cook the vegetables for 10 minutes. Place them in 4 ovenproof dishes and arrange the toasted bread, cheese, and eggs on top. Season them and place them in the oven at 180°C for approximately 8 minutes.

Serve and decorate the dishes with a few parsley leaves. 


Baked Napoleon Eggs Recipe Step by Step

Dice the bread, place it on a baking sheet, and bake at 220°C until golden brown. Remove and set aside.

Peel and chop the garlic cloves and brown them in a pan with a drizzle of oil. Julienne the spring onions and add them. Remove the stems and seeds from the peppers, cut them into large cubes, and add them. Cook the vegetables for 10 minutes.

Place them in 4 ovenproof dishes and arrange the toasted bread, cheese, and eggs on top. Season them and place them in the oven at 180°C for approximately 8 minutes.


Serve and decorate the dishes with a few parsley leaves, and the Eggs Napoleon will be ready to be enjoyed. 


Eggs are the ideal solution for unexpected needs and quick meals, without spending a lot of money or time in the kitchen.

If you add to all this the ease with which they are chewable and easy to digest, you can understand why eggs are so attractive in the kitchen. 

Monday, June 2, 2025

Michoacan pork rind gorditas

 Gorditas Michoacanas de Chicharrón: Historia y Receta


Michoacan pork rind gorditas are a typical Mexican snack. They consist of thick corn tortillas filled with pressed pork rinds and fried in oil. They are served open-faced and accompanied by onion, cilantro, fresh cheese, and red salsa. They are a delicacy that you can enjoy at any time of day, for breakfast, lunch, or dinner. 


The origin of Michoacán pork rind gorditas dates back to pre-Hispanic times, when indigenous people made thick tortillas with nixtamalized corn dough and filled them with various ingredients, such as beans, meat, cheese, or vegetables. These tortillas were cooked on a comal or fried in oil and were called "tlacoyos" or "tlaxcales."

With the arrival of the Spanish, new ingredients were introduced to Mexican cuisine, such as pork, cheese, and lard. Thus, tlacoyos transformed into the gorditas we know today, filled with pressed pork rinds, a way of preparing pork rinds seasoned with chilies and spices and pressed into a plastic bag.

Michoacán pork rind gorditas originate from the state of Michoacán, where they have been consumed as part of the daily diet for centuries. It's said that the first Michoacan gorditas were prepared in the town of Quiroga, where the National Pressed Pork Crackling Fair is held every year. However, this dish has spread throughout the country and can be found in many street stalls, markets, and restaurants. 


Equipment

 Frying pan
Knife

Ingredients

1 kg corn dough
350 g pressed pork rinds
250 g fresh cheese
500 ml oil
1/2 onion
1 bunch of cilantro
1 cup cottage cheese
1 cup red sauce
1 teaspoon baking powder
1 pinch of salt
Water


Preparation

Finely chop half an onion and the cilantro.
Crumble the fresh cheese.
Mix the baking powder with a pinch of salt and a little water.
Knead the mixture and form small balls; flatten the centers slightly, creating hollows.
Fill with pork rinds and cottage cheese.
Shape again into a circle and flatten.
Fry the gorditas in oil until golden brown and cooked through.
Then, open the gorditas and add fresh cheese, cilantro, onion, and salsa.

 Tips

To ensure the oil is hot enough, you can drop in a small ball of dough. If it bubbles, it's ready. The right temperature will help the gordita absorb less oil. 


They're delicious!!

Bon appétit!! 


Thursday, May 15, 2025

Japanese-style fried Karaage chicken recipe


 Pollo Karaage con mahonesa de especias japonesas - Canal Cocina


 Karaage is a very typical Japanese frying technique. To make it extra crispy, it's usually fried twice, and it's best to let the chicken cool completely before frying it a second time.


Ingredients 


4 chicken thighs (about 600 g)

Vegetable oil

50 g wheat flour

50 g cornstarch

1 egg

1 centimeter grated ginger

2 garlic cloves

2 tablespoons Japanese soy sauce

3 tablespoons sake

White pepper


Elaboration


1. Cut the chicken thighs into large chunks.

2. Peel and grate the garlic cloves.

3. Place the chicken in a bowl, add the grated garlic and ginger, the Japanese soy sauce, sake, a pinch of white pepper, and the egg, and mix well.

4. Cover and let marinate in the refrigerator for 30 minutes or longer.

5. In a dish, mix the wheat flour and cornstarch and coat the chicken on both sides with flour.

6. Fry the chicken pieces in a pan with plenty of vegetable oil over medium heat until golden brown, 3 to 4 minutes, depending on their size.

7. Remove the chicken pieces to a wire rack or a plate lined with paper towels to remove excess oil and let cool.

8. Increase the heat and, when the oil is hotter, fry the chicken a second time until golden brown and crispy. Let it rest on kitchen paper to remove excess oil.

9. Serve with a salad of thinly sliced ​​cabbage or grated cucumber.


Wednesday, May 7, 2025

Monkfish stew with potatoes


 Guiso de rape con patatas, la receta marinera que estabas esperando

Monkfish stew with potatoes homemade seafood stew will be perfect for filling your home with warmth, thanks to a recipe that's as easy as it is effective.


Similar to monkfish stew or fish zarzuela, this grandmother's spoon recipe is the perfect opportunity to reclaim stew recipes and inexpensive spoon dishes.

Easy to make, like certain baked fish dishes such as baked hake, baked sole, or whole baked sea bass, this monkfish stew is perfect for breaking away from the fish routine and treating yourself to a truly craving for a casserole.

Ingredients

Serves 4
Monkfish tail                                        1
Potato                                                    500g
Onion                                         >            1
Garlic clove                                            1
Medium red pepper
1 glass of white wine
Fish stock or fumet to cover
Extra virgin olive oil
Salt 

Preparation

Difficulty: Easy
Total Time 1 hr 30 min


Preparation 15 min
Cooking Time 1 hr 15 min


Chop the onion, garlic, and peppers into brunoise pieces. Dice the monkfish into 2.5-centimeter cubes. Place 4 tablespoons of olive oil in the saucepan, sear the monkfish pieces over medium-high heat, and set aside.

In the same oil, sauté the onion, garlic, and peppers over medium heat for at least 20 minutes. Add the glass of wine and let the alcohol evaporate.

Add the monkfish and chop the potatoes into 1-inch chunks. Cover with water or stock, season with salt, and let simmer for 35-40 minutes over medium-low heat.

Let it simmer, adding broth, water, or stock to taste if it's too dry, or thicken the stew by mashing a few potatoes if necessary. 


What to Serve with Monkfish and Potatoes


Monkfish is one of the fish that proves that beauty and flavor lie within. We can also make a fish stock or broth with it, we can bake it, we can grill it, or we can stew it in a thousand ways…


Thursday, May 1, 2025

Pasta with white chorizo ​​sauce


Pasta con salsa de chorizo


Pasta is always a great option for a simple lunch or dinner. You can prepare it in many different ways to suit your tastes or current cravings. If you combine it with protein and vegetables, you'll also have a very complete dish.


This recipe is for a delicious pasta with chorizo. I thought it was a flavorful alternative to the typical pasta in white sauce or with chicken. It's very easy and quick to prepare, so you can have a delicious meal ready in just a few minutes.


Ingredients

250g of pasta, 

150g of chorizo, half an onion, one tomato, one tablespoon of vegetable oil, one tablespoon of olive oil, 

20g of butter, salt and ground black pepper.


Preparation

Boil the pasta in a pot of salted water for eight to ten minutes, or the time indicated by the manufacturer for firmness. Drain and return it to the pot with a little olive oil. Chop the onion, tomato, and chorizo. First, sauté the onion for about three minutes. Add the tomato and chorizo.

Season with salt and pepper, stir, and cook for about 10 minutes. Add half a cup of water and cook for another five minutes. Finally, pour this chorizo ​​mixture into the pasta pot and mix well. Adjust the seasoning with salt and pepper if necessary.

Preparation time | 25 minutes
Difficulty | Easy


Tasting

The best way to eat these delicious chorizo ​​pasta dishes is piping hot and served with good bread. They can also be accompanied by roasted vegetables and, of course, a glass of red wine, which will go very well. 


Tips

If you like, you can replace the tomato with chopped red bell peppers. It's a delicious variation on this sauce.


Thursday, April 24, 2025

Macaroni with minced meat


 Macarrones con carne picada


Today we bring you a lunch or dinner that is commonly prepared in millions of homes, especially if there are children in the family. Macaroni and beef is a sure bet if we want to eat pasta, and it's one of the most enjoyable pasta recipes.


To avoid falling back on the classic Bolognese sauce, we'll show you how to prepare the meat so that it's infinitely juicier with the help of pancetta. Furthermore, spicing is vital in this type of dish, so don't hesitate to play with your favorite spices to give it your own touch. You can use thyme instead of bay leaf, or even add basil.

While it takes a little longer, cooking the meat over low heat will give us the best possible result, so much so that you'll use this technique to prepare many other dishes.

Regarding the type of minced meat, you can use whatever you like best: a mixture of beef and pork, just beef, or just pork... these combinations are classic and won't change the flavor. Another option is to use turkey or chicken, and even vegetarian options if we use textured soy. It's an incredibly versatile recipe, so we have room to adapt it to our preferences.

Of course, we can use this meat to make delicious macaroni, but it will work for any type of pasta we want to make, be it tagliatelle, farfalle, rigatoni, or spaghetti. What's more, we can also use it to make cannelloni or lasagna.


Ingredients

Macaroni
1 can of tomato sauce
500g minced meat
1/2 spring onion
1-2 garlic cloves
Oregano
Ground pepper
Oil 


Preparing the Sofrito Base with Vegetables and Meat


To prepare this delicious macaroni with minced meat, start by sautéing the pancetta or bacon, including the minced meat. Use a wide saucepan and add a drizzle of olive oil.
Season with salt and pepper. When the meat is perfectly cooked, remove it from the pan and set aside.
Now it's time for the vegetables. Wash them and cut them into cubes. Sauté for approximately 25 minutes. Add salt. After the cooking time is over, pour in the wine. Increase the heat and cook for a couple of minutes.
Next, add the tomato sauce and mix. You can use any homemade tomato sauce from a can, but making your own is even better.
Next, add the minced meat and bacon. Mix. Cook for another 20 minutes over low heat. Adjust the salt and pepper, then set aside to cook the macaroni.


Pasta Preparation and Final Presentation


Place a pot with plenty of water on the stove and add salt. We recommend following the manufacturer's instructions, as each type of pasta requires a specific cooking time. When the pasta is cooked, drain it and add it to the casserole dish containing the meat and tomato.
Mix everything together so that the tomato coats the macaroni and serve.
Finally, you can add a little grated cheese to give it that delicious touch that so many of us love.
To accompany this macaroni, since it is such a hearty dish, we recommend making a light salad, either panzanella or caprese. This will refresh your lunch a bit.

 Tip

When draining the macaroni, if you notice that the pot handles have become hot, cover them with a cloth to avoid burning yourself.


Sunday, April 20, 2025

CHICKEN BREAST IN CREAMY MUSTARD SAUCE


 Pechugas de pollo con salsa de mostaza y estragón


These Mustard Chicken Breasts are one of those dishes that can save a meal, no matter the day or time. The recipe is super easy and impossible to mess up, resulting in juicy breasts with a delicious sauce that's perfect for dipping all the bread in the world.

Treat your loved ones! With a delicious chicken with creamy mustard sauce. We guarantee you'll love our recipe and seasoning. 


Ingredients: Serves 4


1/2 cup chicken broth
6 tablespoons
1/3 cup cream cheese, at room temperature
1 tablespoon finely chopped herbs (parsley, basil, or chives)
1 tablespoon oil
4 (6-ounce) boneless chicken breasts
1 teaspoon finely chopped garlic 


Preparation

Mix the broth, mustard, cream cheese, and herbs until smooth. Set aside.

Cook the chicken in a hot pan with oil for 7 to 8 minutes on each side.

Add the mustard sauce and garlic. Simmer over medium heat for 3 to 5 minutes until the sauce thickens and the flavors develop.

Serve the chicken with vegetables or rice. 


Some tips

Keep in mind that the sauce thickens as it cools, and this is normal. When you heat it, it will be a little thinner again.
Once the sauce has reached the thickness you like, don't let it boil, as the cream in the sauce could curdle. If it curdles, remove the chicken from the pan and add half a tablespoon of cornstarch dissolved in a little milk to prevent lumps when added. Stir until the sauce thickens again and return the chicken to the pan.
If you want the sauce to be thicker, let it simmer for a little longer. If after a couple of minutes you see that the consistency hasn't changed and you'd still like it thicker, you can add a little more cornstarch. As in the previous step, first dissolve it in a little milk to prevent lumps when added to the pan. You could also add more cornstarch when whisking the mixture.
Reminder: When I use tablespoons or teaspoons in the recipe, they're actually measuring spoons (not kitchen spoons). This is important in this recipe because more or less cornstarch affects the final consistency of the sauce.


Friday, April 18, 2025

Chocolate Chip Cookies


Chocolate chip cookies are ideal for breakfast or a snack. Plus, they're very simple and quick to prepare. So much so, that you can make quite a few and store them in a tin. A delicious recipe, perfect for making with the little ones in the house.


 Ingredients 


1 cup unsalted butter
1 cup brown sugar
2/3 cup granulated white sugar
2 eggs
2 1/3 cups + 1 tablespoon all-purpose flour
1 teaspoon Gourmet Baking Soda
1 teaspoon Gourmet Vanilla Essence
2 cups Gourmet Chocolate Chips
Parcel of parchment paper


Preparation

Preheat oven to 180°C. Place parchment paper on a baking sheet.
Beat the butter with both sugars until pale and creamy.
Add the eggs one at a time to the mixture and beat. Set aside.
In a bowl, combine the flour with the Gourmet Baking Soda, then add this to the butter mixture until smooth. Then add the Gourmet Vanilla Essence and the Gourmet Chocolate Chips. Stir.
Place spoon-sized balls onto the prepared baking sheet, leaving space between them.
Add Gourmet Chocolate Chips to the empty spaces in the dough.
Bake the cookies until lightly golden, about 13 minutes. Let cool for 5 minutes and carefully peel them off; let cool completely. 


Sunday, April 13, 2025

Tuna Dip Recipe


Due to their diversity, versatility and generally accessible ingredients, dips are the solution for any occasion.
 
2 cans of tuna
2 tablespoons of chopped onion
1 tablespoon of chopped parsley
1 tablespoon of chopped cilantro
2 tablespoons of mayonnaise
1 tablespoon of chopped bell pepper
3 tablespoons of lemon juice
2 chili peppers (or more to taste)
 
 
1 Wash and finely chop the vegetables. Set aside. 
2 Squeeze one large lemon or two small lemons. This should yield 3 tablespoons. Strain and reserve the juice.
3 Open both cans of tuna, drain the water or oil, and set the tuna aside.
4 In a large bowl or salad bowl, place all the ingredients: onion, parsley, cilantro, paprika, tuna, and mayonnaise.
5 Finally, add the lemon and chili. Our easy tuna dip is ready! 

6 Refrigerate for a few minutes and... enjoy! You can serve this delicious tuna dip spread on crackers, toast, appetizers (snacks, hors d'oeuvres, appetizers, canapés, starters, or tapas), arepas, bread, cassava bread, tortillas, breadsticks, or as a filling for sandwiches or sandwiches. Perfect for any snack!
 
 
7 Tuna and mayonnaise dip is a great option for any occasion, as it goes with almost anything. It's also easy, tasty, affordable, and... it's quick to make!

The flavor of this tuna spread is refreshing and delicious. It also keeps perfectly for 3 days. Perfect for parties! You know, when you need to get out of a last-minute party or have a snack with friends, keep this ace up your sleeve. Any time is a good time for this easy tuna dip.


Wednesday, April 9, 2025

Mexican Tacos

 Mexican Tacos: How to Make Beef, Chicken, and More Tacos!


La Historia de los Tacos Mexicanos | Privilege Club - VacationAsYouAre


 As we all know, Mexican tacos can have different fillings: We can make meat tacos, chicken tacos, vegetarian tacos, whatever! Everything goes well inside a taco. Let's review some of the most traditional taco recipes prepared in Mexico, and why not some innovative alternatives to try at home.

Beef Tacos

 
Ingredients for 10 beef tacos
250g of beef: can be sirloin, rump, or whatever you like best
1 medium red onion
2 garlic cloves
1 fresh chili (optional)
1/2 red bell pepper
1/2 green bell pepper
Juice of 1 lime or lemon
1 medium tomato
Oregano
Dried chili (to taste)
Salt and pepper
Cilantro
Neutral oil

How to Make Beef Tacos

 
Cut the bell peppers and onion into julienne strips, finely chop the garlic and chili, and dice the tomato. Set aside.


Cut the beef into strips and season in a bowl with salt and pepper, add half the lime or lemon juice, and let marinate for about 20 minutes.
If you like, you can do whatever magic you like to flavor the beef at this step: add mustard, a splash of beer, or whatever you like. The idea is for the beef tacos to be really tasty, so anything goes.
In a frying pan, add a splash of oil, the dried chili, and oregano, and heat for about 2 or 3 minutes. Add the garlic and chili and sauté for a few more minutes.
Add the beef and sauté. After 5 minutes, halfway through cooking, add the tomato and finish cooking.
Meanwhile, sauté the rest of the vegetables until cooked, but BE CAREFUL: make sure they are firm.
Mix the two preparations and season with salt and pepper if necessary. Add the remaining lime or lemon juice and the chopped cilantro. 


Chicken Tacos

 
Ingredients for 10 chicken tacos
2 chicken breasts
4 garlic cloves
Juice of 1 lime or lemon
A pinch of parsley
1 green onion
1 tablespoon cumin
Dried chili, to taste
Olive oil
Salt and pepper

How to Make Chicken Tacos

 
Cut the chicken breast into strips and marinate for a while with the lime juice, finely chopped garlic, dried chili, and salt and pepper.
Heat the pan and add a drizzle of olive oil and cumin.
Add the chicken and brown. Add the green onion and adjust the seasoning. When it's ready, set aside!
If you want to add a spoonful of cream cheese, grated cheese, or whatever, it goes great with this chicken taco recipe.


Vegetarian Tacos
 

When it comes to making vegetarian tacos, I don't follow a recipe; I like to sauté whatever vegetables I have at home. Sometimes I add mushrooms, or tofu... anything! Another thing I like to do is sauté the different vegetables separately, so that each taco isn't the same and everyone can add whatever they want.


I wouldn't give you a complete taco recipe if I didn't tell you how to make taco sauces.

Red Salsa
 

Ingredients
1 large or 2 small tomatoes
1/2 red bell pepper
1/2 onion
1 tbsp chipotle chili
Salt and pepper
Olive oil
Process
Cut the vegetables and place them in a roasting pan and bake along with the chili, salt, pepper, and a drizzle of olive oil.
Once they're done, put them in the blender and blend until smooth.
Done!! So easy, right?


Green Salsa

 
Ingredients
3 green chilies
1/2 red bell pepper
1 jalapeño pepper
5 green tomatoes
Cilantro
1/2 onion
Salt


Process


Place the bell pepper, onion, chili, and tomatoes in a pan with a little olive oil and cover. Once they're cooked, let them cool.
Place them in a blender and add salt and cilantro to taste. Blend until smooth.


Enjoy these Mexican tacos from heaven!


Saturday, April 5, 2025

Corn and cheese empanadas


Corn empanadas are a traditional dish that has earned a special place in the hearts of families. They stand out for their succulent and creamy filling, made with fresh corn and a combination of ingredients that enhance their delicious flavor, perfect for a family gathering or any occasion.


 Ingredients

  1 white onion, brunoise
50g bell pepper, brunoise
1 can of yellow corn
1 tablespoon cornstarch
1 egg, lightly beaten
150g cream cheese
120g grated Parmesan cheese
1 teaspoon oregano
salt, pepper, and nutmeg
1 egg mixed with a little cream, for brushing
55 empanada shells

 Step by step

1  Dice the bell pepper and onion and cook them in a pan with a little oil. Add the corn and cook for 2 more minutes. Turn off the heat and let cool.

2 Cut the cheese and ham into squares and place them in a bowl. Add the corn mixture.

3 Beat two eggs and add them to the previous filling. Season with salt and pepper to taste.

4 Fill the discs and make the filling. Place them in an oiled and floured baking dish. Brush with egg.

5 Bake over high heat for 15 to 20 minutes, until golden brown. 


They are served on a plate and can be accompanied with a delicious white sauce, yogurt sauce with fresh herbs, or Creole sauce.


Tips

To ensure your corn filling is juicy and flavorful, use fresh, tender corn. You can use shelled corn or even canned corn, but be sure to drain it well before using to prevent the filling from becoming soggy.


Add other ingredients to the filling to balance the flavors. You can add finely chopped onion, roasted peppers, grated cheese, chopped green olives, or even fresh herbs like parsley or cilantro.


 Empanadas de Choclo y Queso


View Complete in Youtube